Have you ever found yourself staring at a beautifully baked cake, cake server in hand, suddenly struck by the daunting question: “How many slices can I get from this cake?” It’s a common dilemma, especially when hosting a gathering, a birthday party, or a special celebration. The pressure mounts as you consider the number of guests, some hoping for a generous helping, others politely requesting a smaller portion (though secretly wishing for a bigger one!). Ensuring everyone gets an even, satisfying slice without causing a “cake crisis” can feel like a high-stakes culinary challenge.
Beyond simply dividing, the art of cake cutting involves precision, strategy, and a little bit of know-how. This isn’t just about serving dessert; it’s about making sure your hard work in the kitchen is presented perfectly, and every guest leaves happy. We understand the guesswork, the uneven slices, and the minor panic that can ensue. That’s why we’ve put together this comprehensive guide, complete with invaluable tips and a printable resource, to transform you into a cake-cutting connoisseur. Say goodbye to uneven portions and hello to perfectly sliced cake every single time.
Mastering the Art: Cutting Cakes of Different Shapes and Sizes
For many years, the role of cake cutter at family gatherings, especially weddings, was often relegated to the most trusted aunts or seasoned family members. I distinctly recall the surge of anxiety when my nieces and nephews started tying the knot. The mere thought of having to precisely slice a multi-tiered wedding cake, ensuring each guest received a perfectly portioned piece, was genuinely intimidating! Thankfully, I was usually assigned a different, less nerve-wracking role at their ceremonies. But the underlying challenge remains: how do you confidently approach cutting a cake of any shape or size, from a humble birthday treat to a grand celebration centerpiece?
The secret lies in understanding that not all cakes are created equal, and therefore, not all cakes should be cut the same way. The shape and size of your cake are the primary determinants of your cutting strategy. Whether you’re dealing with a classic round, a versatile square, or a practical rectangular sheet cake, specific techniques will help you maximize servings while maintaining a polished appearance. The goal is always to achieve reasonably even slices, not just for fairness but also for presentation. After all, a beautifully cut cake is just as inviting as a beautifully baked one!
Strategies for Different Cake Shapes:
**1. Round Cakes: From Small Gatherings to Grand Events**
The traditional round cake often presents the most common cutting challenge. For smaller round cakes, like a 6-inch or 8-inch diameter, the method is relatively straightforward:
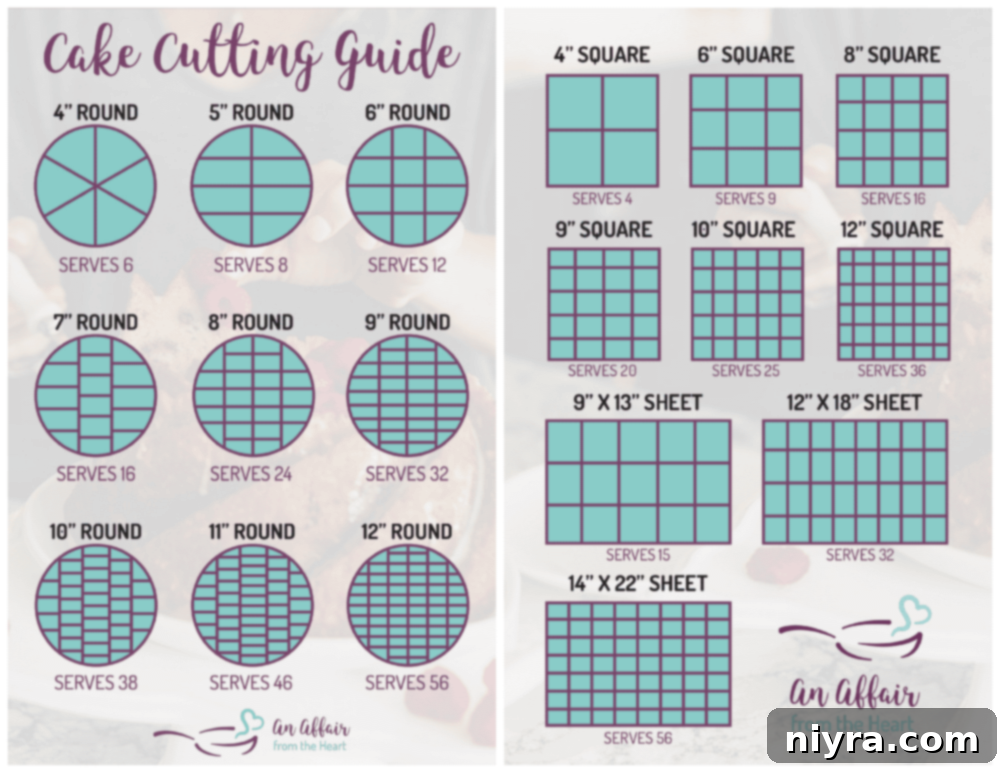
- **Small Round Cakes (6-8 inches):** Begin by making a single cut across the middle, dividing the cake in half. Then, make two more cuts perpendicular to the first, essentially dividing each half into thirds. This technique typically yields 6-8 even slices, perfect for intimate gatherings.
- **Medium Round Cakes (9-12 inches):** For slightly larger round cakes, you can adapt the radial cutting method. Start by dividing the cake into halves, then quarters, and then eighths. Depending on your desired slice size, you can continue dividing each eighth into smaller, more numerous slices. This is where a sharp, long knife and a steady hand come into play.
- **Large Round Cakes (14 inches or more, often tiered):** For impressive large-format or multi-tiered round cakes, often seen at weddings, a different strategy is employed to maximize servings without compromising structural integrity. This involves cutting the cake in a series of concentric circles.
- First, cut a circle about 2 inches in from the outer edge of the cake.
- Then, make parallel slices across this outer ring, creating long, rectangular pieces.
- Once the outer ring is completely sliced, cut a new concentric circle from the remaining cake, and repeat the parallel slicing process.
- Continue this method until only a small central core remains, which can then be sliced into radial wedges. This method is incredibly efficient for large cakes, providing a surprisingly high number of consistent slices.
<
**2. Square and Rectangular Cakes: The Grid Method**
Square and rectangular cakes, such as sheet cakes or brownies, are often the easiest to cut evenly, thanks to their geometric shape. The grid method is your best friend here:
- **Consistent Grids:** Imagine your cake as a grid. Make uniform cuts across the length of the cake, creating strips. Then, make uniform cuts across the width, perpendicular to the first set of cuts, to form perfect squares or rectangles.
- **Adjusting Slice Size:** The spacing of your cuts will determine the size of your slices. For standard servings, aim for cuts approximately 2 inches apart. For smaller, bite-sized portions (e.g., at a dessert buffet), you can space them closer together.
No matter the shape or size of your cake, the principle of making even, consistent cuts remains paramount. It’s not just about aesthetics; it’s about ensuring fairness among your guests. And for those moments when the cake is particularly large or complex, our detailed, printable guide will become your most trusted companion, removing all guesswork from the equation. (And yes, these methods and the guide are incredibly useful for cutting pies too!)
Essential Tips for Achieving Perfectly Even Cake Slices
Achieving beautifully uniform cake slices isn’t just about the cutting strategy; it also hinges on using the right tools and techniques tailored to the specific type of cake you’re working with. A delicate angel food cake requires a different approach than a dense cheesecake or a lavishly frosted wedding cake. Understanding these nuances will elevate your cake-cutting skills from amateur to expert.
- **Choose the Right Cutting Tool:** The type of knife makes a significant difference.
- **For Frosted Cakes & Layer Cakes:** A long, thin, sharp, non-serrated knife is ideal. Its smooth blade glides through frosting and layers without dragging or tearing, creating clean, crisp edges. For very tall layer cakes, ensure your knife is long enough to span the entire width or height.
- **For Unfrosted or Delicate Cakes (e.g., Angel Food, Coffee Cakes, Sponge Cakes):** A serrated knife, like a bread knife or even a tomato knife, is often preferred. The saw-like edge prevents squishing the delicate crumb and helps to cut through softer textures without crushing them.
- **For Dense Cakes (e.g., Cheesecake, Ganache-Glazed Cakes):** A very sharp, thin blade is crucial. Consider the heated blade technique described below.
- **Pre-Score for Precision:** Before making any deep cuts, lightly score the top of the cake where you intend to cut. Use just enough pressure to mark the frosting or surface, creating clear guidelines. This preliminary step helps ensure your final cuts are straight and evenly spaced, significantly reducing the chance of error and promoting consistency.
- **Practice Patience and Gentle Technique:** There’s no need to hack or rush. A smooth, firm stroke is key. Guide the blade down slowly and deliberately, applying even pressure. For cakes with a slightly tougher crust or dense crumb, a slight sawing motion may be helpful, but always maintain control to avoid pulling away chunks or creating jagged edges. Slow, controlled cuts result in clean, consistent-looking slices that hold their shape.
- **Heat Your Blade for Dense or Sticky Cakes:** When dealing with rich, dense cakes like cheesecake, fudgy chocolate cakes, or those with a thick ganache topping, heating your knife blade can make an incredible difference. Run the knife under hot water for about 30 seconds, then quickly and thoroughly dry it with a clean towel. The warm blade will cut through the dense ingredients more smoothly, creating a pristine slice. Reheat and wipe the blade between each cut for the best results.
- **Knife Over Spatula for Initial Cuts:** While many cake serving spatulas have a cutting edge, they are typically designed more for lifting and serving than for making precise initial cuts. For the cleanest, most professional-looking slices, always use a dedicated sharp knife for the actual cutting, reserving the spatula for gently transferring the slice to a plate.
- **Wipe the Blade Between Each Cut:** This seemingly small step is vital for a professional finish and equitable frosting distribution. If you’re cutting a frosted cake, frosting will inevitably accumulate on your knife. Wiping the blade clean with a damp paper towel or cloth after each slice prevents excess frosting from being dragged into subsequent cuts, which can mess up the appearance and lead to some slices having more frosting than others. A clean knife ensures consistently tidy slices and prevents any “frosting politics” at the table!
- **Chill Your Cake (When Applicable):** For many frosted, layered, or dense cakes, chilling them in the refrigerator for at least 30 minutes (or even longer) before cutting can firm up the frosting and the cake itself. This makes the cake much easier to handle and results in cleaner, sharper cuts. Delicate cakes, however, might benefit from being brought to room temperature before serving to enhance their texture and flavor.
- **Ensure a Stable Cutting Surface:** Always place your cake on a flat, sturdy surface or a cake board that won’t slide around. A non-slip mat underneath can provide extra stability, allowing you to focus purely on the cutting technique without worrying about the cake shifting.
Affiliate Link Disclosure: Some of the links you will see on An Affair from the Heart are affiliate links, meaning that, at no cost to you, I may earn a small commission if you click through and make a purchase.
Exploring Common Cake Pans and Their Impact on Servings
The journey to perfect cake slices often begins long before the cake is even baked – it starts with selecting the right pan. Different recipes call for different pan sizes and shapes, and this choice directly influences not only the cake’s appearance but also how easily and efficiently it can be cut into servings. Understanding the characteristics of common cake pans can help you better plan for portioning. On my website, I always recommend specific pan sizes for my recipes and often suggest suitable alternatives, empowering you to bake with confidence. Perhaps it’s time to expand your collection with some versatile new shapes!
- **9×13″ Rectangular Pan**: This is a workhorse in any kitchen, ideal for sheet cakes, brownies, and various bars. Its rectangular shape makes it exceptionally easy to cut into neat, uniform squares or rectangles using the grid method, yielding a high number of consistent servings perfect for larger gatherings.
- **Square Pan (8-inch or 9-inch)**: Typically used for creating layered square cakes or single-layer desserts. Like its rectangular cousin, the square pan lends itself well to the grid cutting technique, offering clean edges and predictable portion sizes.
- **Round Cake Pan (8-inch or 9-inch)**: The classic choice for single-layer cakes, stacked layer cakes, and multi-tiered creations. Cutting round cakes requires more finesse, often utilizing radial or concentric circle methods, depending on the desired number of servings and the cake’s diameter.
- **Bundt Pan**: Known for its distinctive decorative fluted shape, the bundt pan creates visually stunning cakes, often used for coffee cakes or as an alternative to traditional layer cakes. Slicing a bundt cake typically involves cutting wedges from the top, following the natural grooves, which often results in unique, albeit less uniform, portion shapes.
- **Loaf Pan**: Primarily used for pound cakes, quick breads, and smaller specialty cakes. Loaf cakes are straightforward to slice into rectangular portions, making them excellent for individual servings or slices that can be easily plated.
- **Tube Pan**: Essential for baking light and airy angel food cakes. The central tube allows for even heat distribution. Angel food cakes, being delicate, benefit from a serrated knife for clean cuts, often yielding generous wedge-shaped slices.
- **Springform Pan**: The go-to for cheesecakes and other delicate desserts that are difficult to invert. Its removable sides allow for easy release without damaging the cake. Cheesecakes, being dense, benefit from a heated, thin knife for perfectly clean slices.
- **Jelly Roll Pan**: A shallow rectangular pan perfect for baking thin sheet cakes used for cake rolls or delicate bar desserts. Its wide, flat surface makes it straightforward to cut into small, uniform portions.
- **Muffin Tins**: While not for cakes in the traditional sense, muffin tins are essential for baking cupcakes and muffins, which are pre-portioned and require no cutting.
- **Pie Plates**: Available in deep-dish and shallow varieties, pie plates are used for, well, pies! Similar to round cakes, pies are typically cut into radial wedges, and the principles of sharp knives and clean cuts apply.
Other Essential Cake Cutting & Serving Tools
Beyond the perfect pan, a few specialized tools can make your cake cutting and serving experience smoother and more professional:
- **Cake Boards/Drums**: Indispensable for larger cakes, especially multi-tiered wedding cakes. They provide stability, make transferring cakes easier, and offer a sturdy base for precise cutting without damaging the cake’s structure.
- **Plastic Wrap**: Crucial for preserving the freshness of any leftover cake. Tightly wrapping cut surfaces or the entire cake prevents it from drying out, keeping it moist and delicious for longer.
- **Serrated Knife**: As mentioned, this is your go-to for unfrosted cakes, delicate sponges, or those with a crisp crust, ensuring a clean cut without compression.
- **Cake Server/Lifter**: While a knife makes the cut, a good cake server is essential for gently lifting and transferring slices to plates without damage, preserving their perfect form. Especially useful for events like weddings where presentation is key.
- **Cake Leveler:** While not directly for cutting slices, a cake leveler ensures your cake layers are perfectly even. This foundational step greatly contributes to the stability and ease of cutting a multi-layered cake into uniform slices.
- **Offset Spatula:** Primarily used for frosting and smoothing, a well-frosted cake provides a better canvas for making clean, precise cuts.
Visit my Amazon Store for great gift ideas for the baker in your life. (even if it’s you!)
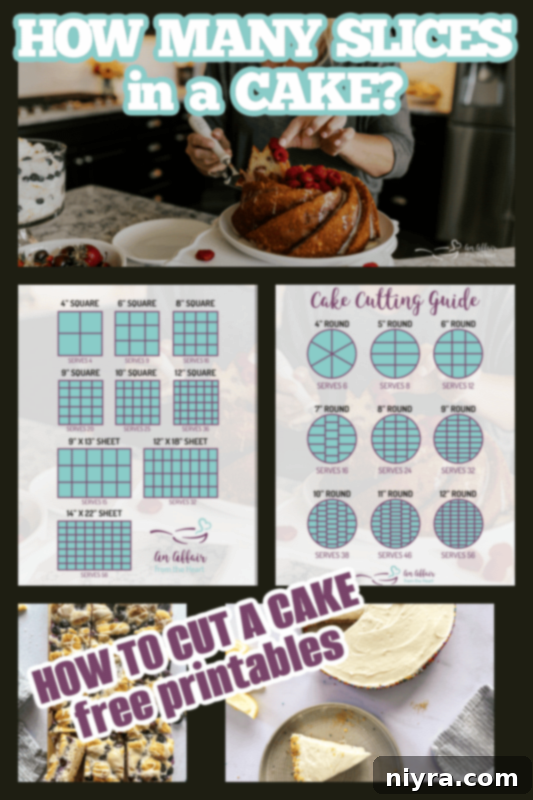
Love it? Pin it!
Don’t let this incredibly useful resource slip away! This comprehensive guide to cutting cakes will be your go-to for every baking adventure. Pin it to your favorite Pinterest baking board now so you can easily reference it whenever you need to perfectly slice a cake for any occasion!
Cutting Will Be a Piece of Cake with This Handy Printable Guide!
No more second-guessing, no more uneven slices, and certainly no more cake-cutting anxiety! With our expertly designed cake cutting guide, you’ll confidently tackle any cake, regardless of its shape or size. Whether your guests prefer a delicate sliver or a hearty slab, this guide provides clear, easy-to-follow instructions to ensure you cut like a seasoned pro every time. We’ve made it incredibly simple to access this valuable tool – just click this PDF link, and you can instantly print your free, indispensable cake cutting guide. It’s designed to be a practical, on-hand reference for all your baking and serving needs.
Please know that I created these printable guides as a gift for my wonderful readers. They are copyrighted and intended for personal use only. They cannot be used for commercial purposes or resold.
More Kitchen How-To’s & Genius Hacks
Beyond mastering the art of cake cutting, my website is a treasure trove of practical “How-To’s” and clever kitchen hacks designed to make your time in the kitchen more efficient and enjoyable. From baking fundamentals to clever ingredient substitutions, there’s a wealth of knowledge waiting for you. Dive into my “How To’s” section to explore even more culinary wisdom. Here are some of my most popular and useful guides:
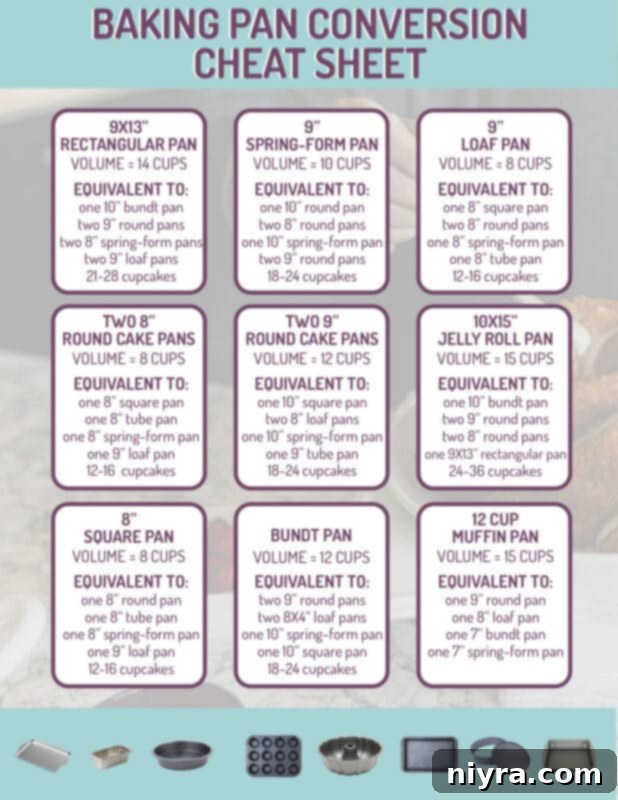
- **Baking Pan Conversion Cheat Sheet** (as pictured above – another essential for any baker!)
- **How to Toast Coconut Perfectly**
- **Easy Buttermilk Substitution**
- **DIY Bisquick Mix (Substitution)**
- **Mastering Chocolate Ganache**
- **The Benefits of Grating Your Own Cheese**
- **How to Freeze and Effectively Use Ripe Bananas**
Delicious Cake Recipes to Practice Your New Skills
Now that you’re equipped with the ultimate cake cutting guide and expert tips, it’s time to put your newfound skills to the test! What better way to practice achieving those perfectly even slices than with some truly irresistible cakes? Here are some of my absolute favorite cake recipes that are sure to be a hit and provide ample opportunity to hone your cake-cutting prowess:
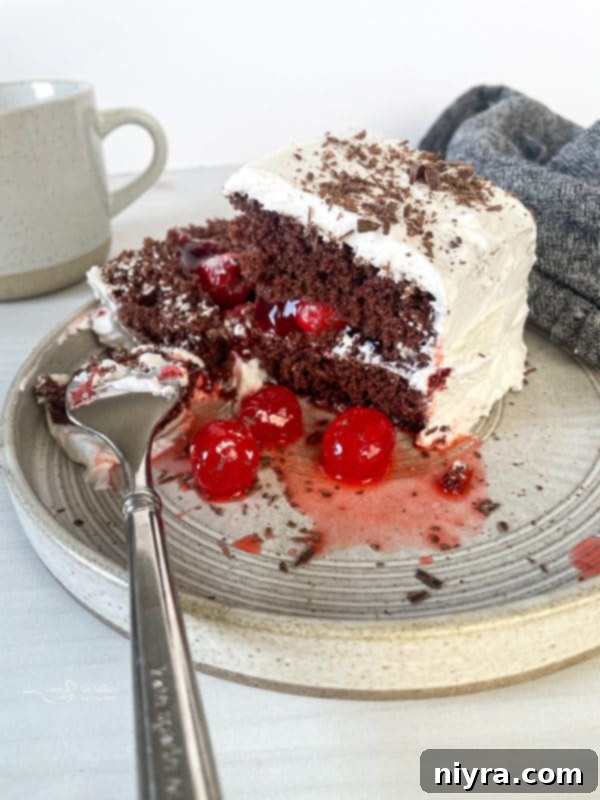
- **Classic Black Forest Cake** (featured above – rich, decadent, and a joy to slice!)
- **Decadent Chocolate Macaroon Tunnel Cake**
- **The BEST German Chocolate Cake**
- **Rich Bittersweet Chocolate Coffee Cake**
- **Comforting Fresh Apple Cake**
- **Fun and Unique Popcorn Cake**
Enjoy this free cake-cutting guide and happy baking!

